Creating a network
This guide walks through creating a network with one relay (server) and two clients (client-1 and client-2), all connected to the same hub. The dashboard used is the one of the node that keeps the networks, which is also the relay.
Create the network
Go to the Networks section and click + Network. The network is created right away and its page opens. It starts with:
- the name
Network(orNetwork (1),Network (2), … if that name is taken), - the subnet
100.65.254.0/24, - the node you are using as its relay (on the cloud hub, no relay yet: see The relay node), and
- every node connected to the hub, each with the next free IP address in the subnet.
Change the Name under Network Settings, then click Save Network in the top-right corner, or press Ctrl + S.
Until you save, the header shows an Unsaved changes badge. If you try to leave the page with unsaved changes, you are asked to confirm first. Saving a network regenerates and redeploys its pipelines, so there is no separate start or deploy step.
The Subnet CIDR must be an IPv4 range large enough for every node in the network. For example, a /24 fits up to 254 nodes.
The network page
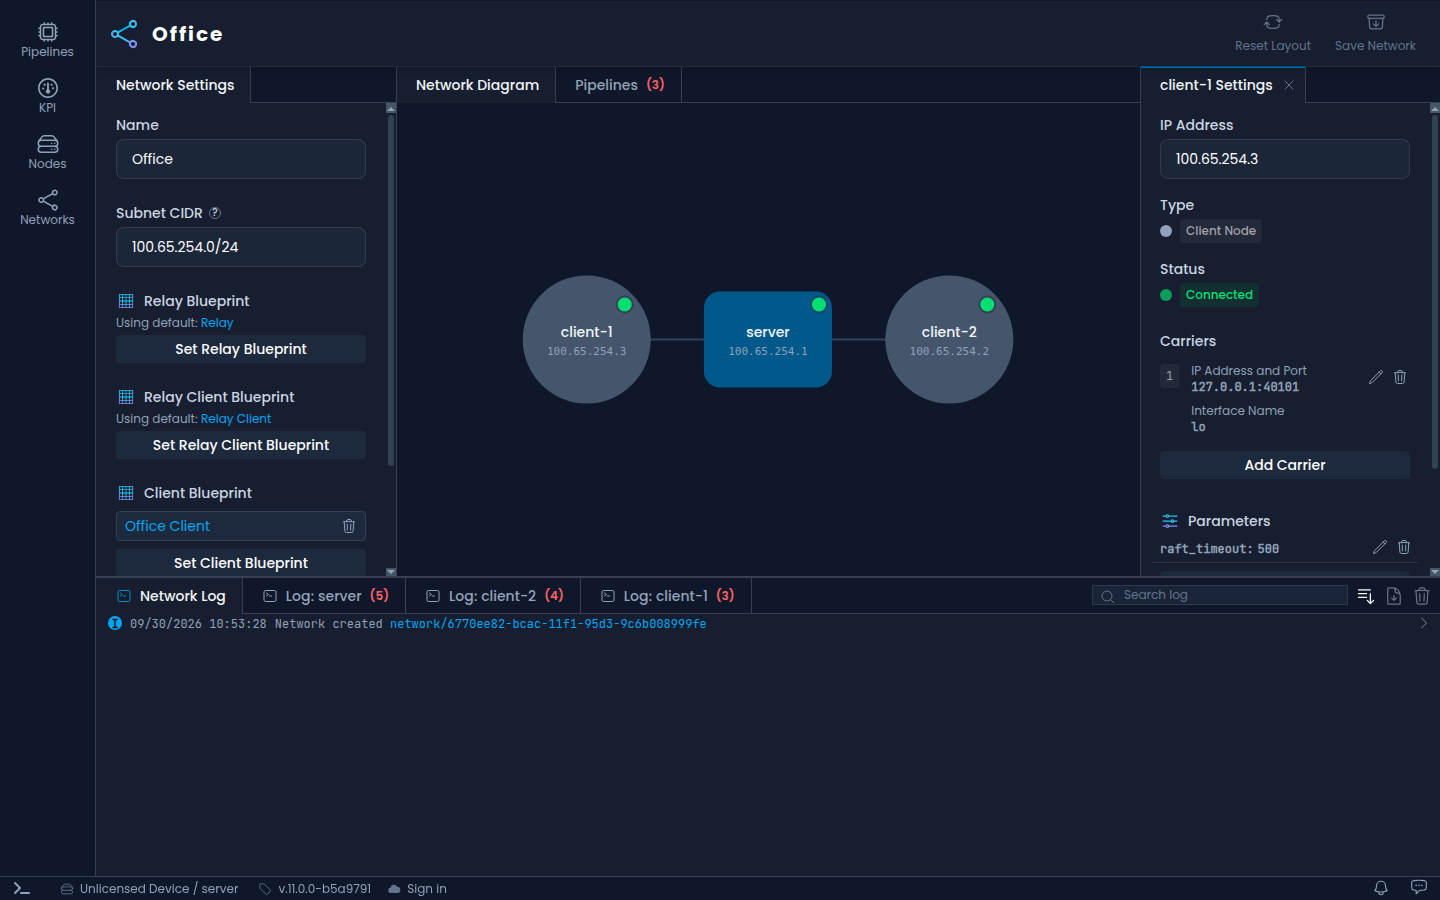
The page is split into panels. You can drag them to rearrange the layout, and Reset Layout restores the default.
- Network Settings: the name, subnet, blueprints and parameters of the network.
- Network Diagram: the relay (the rounded square in the middle) and its clients, with each node's internal IP address. A green dot means the node is online. A red ! means the node has no carrier yet. Click a node to open its settings.
- Pipelines: the pipelines generated for the network, grouped by node, with their latest status. The toggle on each row enables or disables a pipeline. The tab shows how many pipelines have failed.
- Network Log and Log: <node>: messages about the network and about each node's part in it, such as blueprint errors. Each tab shows how many errors it contains. You can search, download or clear a log.
Node settings
Clicking a node in the diagram opens its Settings panel. It shows:
- IP Address: the node's internal IP address. You can change it, but it must be unique in the network.
- Type: Relay Node or Client Node.
- Status: whether the node is currently connected.
- Carriers and Parameters, described below.
Carriers
A carrier tells the network how to reach a node. Nodes get the carriers from their default carriers configuration when they join a network. Any node without a carrier is marked with a red ! in the diagram and a No carrier badge in the network list, and it needs one before its pipelines can be generated.
To add a carrier, click the node, then Add Carrier, fill in the fields and click Add. When every node has a carrier, click Save Network.
| Field | Description |
|---|---|
| IP Address | The local IPv4 address the node sends and receives network traffic on. The list offers the node's own interface addresses. |
| Port | The UDP port to use with the IP address (1 to 65535). |
| Interface Name | The network interface to use. Picking an IP address fills in its interface, and the other way round. |
| External IP (optional) | The address other nodes should use to reach this carrier, for example the public address of a router that forwards the port. It can only be set together with an IP address and port. The built-in blueprints use it on the relay: if it is set, clients connect to it instead of the relay's IP address. |
| Bandwidth Priority (optional) | A whole number. The built-in blueprints pass it to the Raft carrier, which then sends traffic over the highest-priority carriers first, up to their estimated bandwidth. Set it on all of a client's carriers or on none of them. |
What a carrier needs depends on the node:
- The relay needs exactly one carrier, with an IP Address and Port that every client can reach. If the relay is behind NAT, set External IP to the public address that forwards to it.
- A client needs an IP Address and Port, an Interface Name, or both. A client can have several carriers, and the built-in blueprints use all of them at the same time.
Use the pencil icon to edit a carrier and the bin icon to remove it.
Parameters
Parameters are key-value pairs that you can use in blueprints. They can be set on the network, under Network Settings, or on a single node, in its Settings panel.
Click Add Parameter, enter a Key and a Value, and click Add. Values are read as JSON, so 300 is a number and {"mode": "fast"} is an object. Anything that isn't valid JSON is kept as a plain string.
The built-in blueprints read raft_timeout: the Raft stream timeout in milliseconds, which is 200 by default. In the recording, the network gets raft_timeout 300, and client-1 overrides it with its own value of 500:
Checking the network
After saving, open the Pipelines tab to see the pipelines of each node. If a pipeline has failed, open the Log tab of that node to find out why.
The network list in the Networks section also flags problems with badges next to each network:
- No carrier (N): N nodes have no carrier yet.
- Failed pipelines (N): the latest run of N pipelines ended with a start failure or an unexpected failure.
Clientpipelines fail withSTART FAILURE: the node isn't allowed to create thetun0interface. Run NanoPing as root, or with the capabilities to create network interfaces, on every node. See Configuration.- Blueprint errors like
index of untyped nilin a node log: a node has no carrier, so the blueprint has no address to use. Add a carrier and save again.
The relay node
On a hub of your own, the relay is always the node that keeps the network, which is the node whose dashboard created it. The Set as Relay Node button in a client's settings is only accepted when that client is the node keeping the network. To move the relay to another node, create the network from that node's dashboard instead.
On the cloud hub, no node keeps the networks, so a new network starts without a relay, and no pipelines are deployed until it has one. Click the node that should relay it, click Set as Relay Node, give it a carrier, and click Save Network. Any node on the cloud hub can be the relay, and you can move it to another node the same way, but a network cannot be left without one.
Deleting a network
In the Networks section, open the ⋯ menu on the network's row, choose Delete and confirm. Its pipelines are removed from every node.